Why do we need to upgrade PHP?
Upgrading the PHP version on your Ubuntu server is super important for security, performance, and compatibility with the latest frameworks, composer packages, and WordPress themes/plugins you use for your projects. Older PHP versions eventually stop receiving security updates, leaving your server vulnerable to attacks.
Additionally, newer PHP versions bring significant performance improvements, making your websites faster and more efficient.
Here’s how you can upgrade your PHP version on your Ubuntu server in just three simple steps:
Steps to upgrade the php version
✅ Step 01: First, you need to add the Ondřej Surý PHP PPA repository, which provides updated PHP versions for Ubuntu.
sudo apt install software-properties-common
👨🏻💻 sudo apt install software-properties-common — installs the package that helps manage additional repositories easily.
sudo add-apt-repository ppa:ondrej/php
👨🏻💻 sudo add-apt-repository ppa:ondrej/php – Adds the trusted PPA that contains the latest PHP versions for Ubuntu.
sudo apt update
👨🏻💻 sudo apt update – Updates your package list so that the system recognizes the newly added PHP versions.
✅ Step 02: Now, install the PHP version you want to upgrade to. For example, to install PHP 8.2, run:
sudo apt install php8.2
If you need to install common PHP extensions, you can add them like this:
sudo apt install php8.2-cli php8.2-fpm php8.2-mysql php8.2-curl php8.2-xml php8.2-mbstring
✅ Step 03: After installation, confirm that your server is using the updated PHP version by checking the PHP version:
php -v
You should see the new PHP version displayed in your terminal, ensuring that the upgrade was successful.
Bonus Tips:
After upgrading PHP, restart your web server to ensure it starts using the new PHP version.
For the Apache server, use the following command to restart.
sudo service apache2 restart
For the nginx server, use the following command to restart.
sudo service nginx restart
Are you still receiving the old PHP version?
You installed PHP 8.2, but your CLI still points to the older PHP version.
This usually happens because:
- The old PHP binary (php) is still the default in /usr/bin/php.
- The newly installed PHP 8.2 is available but not set as default.
Run the following command to check the installed php versions:
sudo update-alternatives --config php
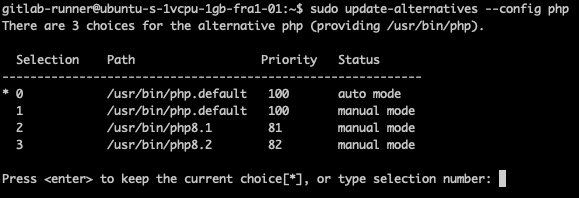
Press the number for PHP 8.2 (e.g., 2) and press Enter.

Upgrading your PHP version on your Ubuntu server is a straightforward process that ensures your applications remain secure, quick, and compatible with modern PHP frameworks. By following these three simple steps, you can keep your server healthy and reduce vulnerabilities while taking advantage of the performance improvements in the latest PHP versions.
If you found this guide helpful, consider sharing it with your developer friends or bookmarking it for your next server upgrade.
Pingback: Easy fixing of PHP gd extension error - Premium WordPress Themes and Plugins By xenioushk