Pricing table is a cool way for representing pricing schemes, features and categories of our products in website. Most of the time pricing table used for showing different kinds of hosting plans and packages by web hosting companies. Users can easily compare prices between different packages from lists of pricing columns and choose best plan that suit for their business most.
Today I’m going to show you how to create a cool pricing table with 4 color theme using css3 within 15 min(approx.) Lets get started –
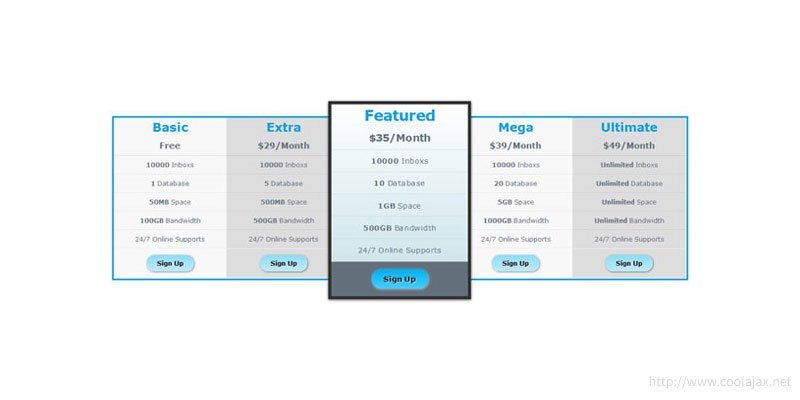
What We Are Going To Create:

Is Really Possible To Create Pricing Table In 15 min?
Yes it’s possible. Before start coding, first of all you need to know what kind of HTML elements you are going to use in that pricing table. Here goes a list –
1. Single unordered list (UL) as pricing table wrapper.
2. 5 Lists(LI) for showing no of product packages columns.
3. 3 Divs inside LI for package price, package features and a signup buttons.
4. Inside package feature we use another unordered list(UL) for feature texts.
5. We also use 4 spans for package names and buttons text.
That’s it. Lets go for coding.
CSS3 for cool pricing table
I’ve created 4 color themes for demo. Here I’m going to present CSS3 Snippet for blue theme. I’ve also added some css3 button effects, so that it looks more pretty. You can also check my previous post on How to create CSS3 Buttons.
*{margin: 0; padding: 0;}

.bcpt_wrapper{
    font-family: verdana,Arial,sans-serif,serif;
    font-size: 12px;
    width: 1100px;
    margin: 150px auto 0 auto;
    border:3px solid #009eea;
    height: 312px;
    color: #000000;
    line-height: 3.0em;
    text-align: center;
}

.bcpt_wrapper>li{
  list-style-type: none;
  width: 19.8%;
  float: left;
}

.bcpt_wrapper>li.gray_background{
  background:#dddddd;
}

.bcpt_wrapper>li.white_smock_background{
    background: #f8f8f8;
}

.bcpt_wrapper .price{

    box-shadow: 0 0px 1px rgba(0, 0, 0, 0.2);
}

.bcpt_wrapper .price .package{
    display: block;
    font-size: 23px;
    font-weight: bold;
    color: #009eea;
}

.bcpt_wrapper .price .price_amount{
    font-size: 16px;
    font-weight: bold;
    color:#63707c;
}

.bcpt_wrapper .features li{
    list-style: none;
    color:#63707c;
    box-shadow: 0 0 1px rgba(0, 0, 0, 0.1);
}

.bcpt_wrapper .footer{
    text-align: center;
    box-shadow: 0 0px 1px rgba(0, 0, 0, 0.2);
    border-top: 1px solid #ffffff;
    padding: 10px 0;
}

.bcpt_wrapper .footer .signup_button{
    background: linear-gradient(#8edcf8, #bfebfb) repeat scroll 0 0 transparent;
    border-radius: 15px 15px 15px 15px;
    color: #000000;
    display: inline-block;
    font-weight: bold;
    padding: 4px 20px;
    text-decoration: none;
    line-height: 2.0em;
    -webkit-transition: all 0.5s ease-in-out;
    -moz-transition: all 0.5s ease-in-out;
    -o-transition: all 0.5s ease-in-out;
    -ms-transition: all 0.5s ease-in-out;
    transition: all 0.5s ease-in-out;
    box-shadow: 1px 1px 3px rgba(0,0,0,0.5);
    text-shadow: 1px 1px 1px rgba(255,255,255,0.8);
}

.bcpt_wrapper .footer .signup_button:hover{
    box-shadow: 1px 1px 5px rgba(0,0,0,0.8);
}

.clear{
    clear: both;
}

.bcpt_wrapper>li.active{

    transform: scale(1.2);
    box-shadow: 0 1px 4px rgba(0, 0, 0, 0.7);
    border: 5px solid #333333;
    background: linear-gradient(#FFFFFF,#c6e1e8);

}

.bcpt_wrapper>li.active .footer{
    background: #63707c;
}

.bcpt_wrapper>li.active .signup_button{
  background: linear-gradient(#00aff0,#48cdff);
  color: black;
  box-shadow: 1px 1px 3px rgba(255,255,255,0.5);
  -webkit-transition: all 0.5s ease-in-out;
  -moz-transition: all 0.5s ease-in-out;
  -o-transition: all 0.5s ease-in-out;
  -ms-transition: all 0.5s ease-in-out;
  transition: all 0.5s ease-in-out;
  text-shadow: 1px 1px 1px rgba(255,255,255,0.8);
}

.bcpt_wrapper>li.active .signup_button:hover{
    box-shadow: 0px 1px 8px rgba(255,255,255,0.8);
}
– HTML Mark Up:
Here goes HTML Markeup for pricing table. You can use these template for all pricing tables. I’ve used 5 columns for demo. Try to create pricing tables with 7 columns.
<ul class=”bcpt_wrapper”>
<li class=”white_smock_background”>
<div class=”price”>
<span class=”package”>Basic</span>
<span class=”price_amount”>Free</span>
</div>
<div class=”features”>
<ul>
<li><strong>10000</strong> Inboxs</li>
<li><strong>1</strong> Database</li>
<li><strong>50MB</strong> Space</li>
<li><strong>100GB</strong> Bandwidth</li>
<li>24/7 Online Supports</li>
</ul>
</div>
<div class=”footer”>
<a href=”#” class=”signup_button”>Sign Up</a>
</div>
</li>
<li class=”gray_background”>
<div class=”price”>
<span class=”package”>Extra</span>
<span class=”price_amount”>$29/Month</span>
</div>
<div class=”features”>
<ul>
<li><strong>10000</strong> Inboxs</li>
<li><strong>5</strong> Database</li>
<li><strong>500MB</strong> Space</li>
<li><strong>500GB</strong> Bandwidth</li>
<li>24/7 Online Supports</li>
</ul>
</div>
<div class=”footer”>
<a href=”#” class=”signup_button”>Sign Up</a>
</div>
</li>
<li class=”active”>
<div class=”price”>
<span class=”package”>Featured</span>
<span class=”price_amount”>$35/Month</span>
</div>
<div class=”features”>
<ul>
<li><strong>10000</strong> Inboxs</li>
<li><strong>10</strong> Database</li>
<li><strong>1GB</strong> Space</li>
<li><strong>500GB</strong> Bandwidth</li>
<li>24/7 Online Supports</li>
</ul>
</div>
<div class=”footer”>
<a href=”#” class=”signup_button”>Sign Up</a>
</div>
</li>
<li class=”white_smock_background”>
<div class=”price”>
<span class=”package”>Mega</span>
<span class=”price_amount”>$39/Month</span>
</div>
<div class=”features”>
<ul>
<li><strong>10000</strong> Inboxs</li>
<li><strong>20</strong> Database</li>
<li><strong>5GB</strong> Space</li>
<li><strong>1000GB</strong> Bandwidth</li>
<li>24/7 Online Supports</li>
</ul>
</div>
<div class=”footer”>
<a href=”#” class=”signup_button”>Sign Up</a>
</div>
</li>
<li class=”gray_background”>
<div class=”price”>
<span class=”package”>Ultimate</span>
<span class=”price_amount”>$49/Month</span>
</div>
<div class=”features”>
<ul>
<li><strong>Unlimited</strong> Inboxs</li>
<li><strong>Unlimited</strong> Database</li>
<li><strong>Unlimited</strong> Space</li>
<li><strong>Unlimited</strong> Bandwidth</li>
<li>24/7 Online Supports</li>
</ul>
</div>
<div class=”footer”>
<a href=”#” class=”signup_button”>Sign Up</a>
</div>
</li>
</ul>
<div class=”clear”></div>
I’ve added some extra color codes in style-sheet. You can easily change them. In below I’ve added all themes demo and download link.
– Demo & Download:
1. Gray Theme.
2. Blue Theme.
3. Green Theme.
– Conclusion:
I hope these ideas of pricing able can give you some points and create a scope to innovate another nice pricing table with simple HTML and CSS3 stuffs. You know, We can see thousands of pricing table designs around us but don’t know how they designed or created. They looks like very fancy but it’s all about cool css3 tricks. So, now you know all secrets about how to create a pricing table. You can use my themes as your template. Change colors, background, fonts, try different width or height, make some cool buttons and create a new one and then share with us 🙂
– Now It’s Your Turn:
What kind of points or ideas did I missed in my tutorial? What do you think about designing cool pricing tables. Share your ideas, knowledge and suggestions with us below in discussion area.
Enjoy!